A Quick Guide to CSS Specificity

Frontend developer who weaves creativity and code, book lover, avid traveller and a tech enthusiast
CSS is definitely not easy and neither it is too hard. However, there are whole lot of things to comprehend and learn in the journey of CSS. One of such topic that you must understand is CSS Specificity.
Before delving into the topic, lemme ask you, 'Have you ever been in a situation where your CSS does not work as expected?'. Well, one reason could be the CSS Specificity.
But... what the heck 🤷♂️ is this CSS Specificity? If you don't know yet then please allow 😁😁 me to explain.
CSS Specificity Explained 📝
There could be case where multiple CSS have been written for same element and based on certain rules, the browser decides which CSS rule to apply on that element. That rule or method is known as CSS Specificity.
In layman terms, Specificity is a score that determines which CSS rule will be applied to certain element.
Let's see an example here:
<button class="color-1 color-2" id="color">Hello, CSS</button>
.color-1 {
    background: red;
}
There is no doubt the background of the button will be red as there is a single style to be applied.
But what will be the result if there are two styles?
.color-1 {
    background: red;
}

.color-2 {
    background: blue;
}
Output

The background colour of the button will be blue as the order of the style matters. The CSS rule which appears last is generally applied however, this rule is not always considered.
Let's understand the above statement via this example.
#color {
  background: green;
}

.color-1 {
    background: red;
}

.color-2 {
    background: blue;
}
Any guess, what will be the output?
Output

In this case, the style with ID selector has been applied rather than the style declared at last.
This is because of Specificity Rule. According to this rule, if two selectors apply to the same element, the one with higher specificity wins.
Specificity Values?
Based on the selectors used, the specificity value also increases or decreases.
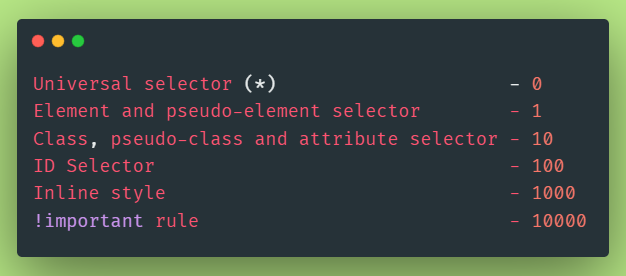
1. Universal selector(*):
A universal selector has no specificity at all and thus has 0 points.
* {
  color: pink;
}
2. Element or pseudo-element selector:
They both receive 1 point of specificity.
p {
  color: red;
}
::before {
  color: green;
}
3. Class, pseudo-class or attribute selector:
Class, pseudo-class or attribute selector receives 10 points of specificity.
.class {
  background: green;
}
:hover {
  background: green;
}
a[href="https://example.org"] {
  color: green;
}
4. ID Selector:
An ID Selector receives 100 points of specificity. If you want to increase the specificity, try using ID Selector.
#id {
  background: pink;
}
5. Inline style:
This method receives the specificity of 1000 points.
<div style="color:blue">Hello! CSS</div>
6. !important rule:
This rule receives the highest specificity of all i.e. 10,000 points. If you want to override the specificity of all items then you can use this !important rule.
.class {
  color: red !important; /* 10,000 points */
  background: blue; /* 10 points */
}
Here is a quick summary of the specificity values
How to calculate CSS Specificity?
A simple method to calculate specificity is to start with a = 0, b = 0, c = 0, d = 0 and replace the numbers with selectors accordingly. For example:
- a = 1 if the style is inline
- b = number of ID selectors being used
- c = number of attribute selectors, classes and pseudo-classes,
- d = number of element names and pseudo-elements.
Let's calculate the specificity now:
<p style="color:blue;>"Here, a = 1, b = 0, c = 0, d = 0 hence specificity value = 1,000.nav ul li a:hoverHere, a = 0, b = 0, c = 1, d = 4 hence specificity value = 0014#sidebar form input[type="text"]Here, a = 0, b = 1, c = 1, d = 1 hence specificity value = 111
You can also use this tool to measure specificity and also please refer this .
I hope you enjoyed reading this article. Feedback is appreciated. Thank you for reading.


